 |
| 2014 MacBook Air 11" (MD711x/B) |
- 1.4GHz Intel Core i5 4250U
- Intel HD 5000 graphics
- 4GB DDR3-SDRAM
- 128GB SSD
- 11.6" 1366x768 HD LED screen
- 2xUSD3.0
- 802.11ac Wi-Fi
- 1.1kg
Win7 Installation Procedure
- Purchase Win7 and download ISO (I used the very last link to this file "X17-24395.iso") to a USB drive;
- Fire up the MacBook Air, connect to the Internet, and insert your USB drive with the ISO file;
- Also insert a USB2.0 drive with at least 8GB capacity - this USB key will be wiped and will become the "Win7 install disk" - this USB drive must be USB2.0;
- Now go to Boot Camp Assistant (type Command + Space, and enter "Boot Camp") and select these options:

- Select the ISO from the source USB drive, and the destination USB2.0 drive;
- Now settle in while the Macbook copies and downloads files, and creates the Win7 install disk;
- Once done, remove the USB drive with the ISO file - we're done with this one now;
- Next you'll be asked to size your Win7 partition (I managed 87GB out of the 128GB);
- Then the Macbook will restart and hopefully boot from the Win7 install disk and hopefully you will get to this screen

- At this point, apparently you should take out the Win7 install disk then hit "Install Now" and then reinsert the Win7 USB drive. This is by far the weirdest thing, but it worked for me...
Troubleshoot - if your screen freezes here, it's most likely because the Macbook isn't able to load the Windows keyboard and trackpad drivers. The solution, sadly, is to go back into Mac OS (which may need you to press the Option key on power up), fire up Boot Camp, delete the Win7 partition, then create a new Win7 partition per Step 8. Note that I don't believe you can boot straight to your Win7 install disk using the Option key at power up, you must reboot via Boot Camp
Troubleshoot - if you get told "No device drivers were found" and you can't get the MacBook to recognise them, then you may have missed Step 10 above, in which case there's nothing for it but to go back into Mac OS, fire up Boot Camp, delete the Win7 partition, then go back to Step 8.
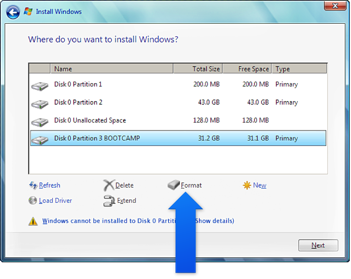
Troubleshoot - if you have trouble getting Boot Camp to delete the Win7 partition, it may be because the Win7 partition needs to be re-formatted. Go to the Disk Utility, select the partition and format as "journaled", then go back to Boot Camp to delete the partition. If all else fails, you can reinstall OS X, by holding down Command+Option+R on power up, and selecting Install OS X. - If everything has gone to plan, you will then get this screen, where you select your Boot Camp partition, format it and hit next.
- Once your Win7 install is complete, go into the Win7 install disk, and run the Boot Camp Support Software, which will let you customise a few things, like left clicking and right clicking on the trackpad.

NEW RIG
Mobo for New Rig
Software for New Rig
And Now (Software)
And Now (Hardware)
Getting Closer to Next Project
Next Project
Windows 7 Starter Kit
2nd Baby Arrived (father doing well)
Baby News
RKHTPC
No comments:
Post a Comment